A dripping faucet is one of the most common household plumbing problems. It wastes water, increases utility bills, and can even stain your sink over time. The good news is that most dripping faucets are caused by worn-out or loose components inside the faucet mechanism, and you can usually fix them yourself with a few tools.
1. Gather Tools and Materials
You don’t need a plumber’s toolbox—just these essentials:
* Adjustable wrench or basin wrench
* Flathead and Phillips screwdrivers
* Allen wrench set (for modern faucets)
* Replacement washers, O-rings, or cartridges (depending on faucet type)
* Plumber’s grease (silicone-based, not petroleum-based)
* Towel and small container (to catch water and hold small parts)
2. Identify Faucet Type

Different faucets drip for different reasons. Look at the handle style:
1. **Compression faucet (two handles)** → Uses washers that wear out.
2. **Cartridge faucet (single or double handle)** → Uses replaceable cartridges.
3. **Ceramic disk faucet** → Uses a ceramic cylinder inside.
4. **Ball faucet (single handle, common in kitchens)** → Uses a ball assembly with O-rings.
Knowing the type helps you know which part to replace.
3. Shut Off the Water Supply
* Look under the sink for shutoff valves (small knobs on pipes).
* Turn them clockwise until tight.
* Open the faucet to drain leftover water.
*Tip:* If you can’t find shutoff valves, turn off your home’s main water supply.

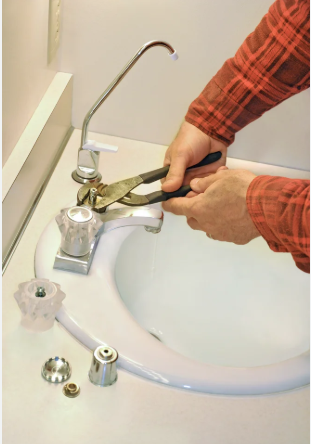
4. Disassemble the Faucet
1. **Plug the drain** with a sink stopper or rag so you don’t lose screws.
2. **Remove the handle:**
* Look for a small screw at the base or behind a decorative cap.
* Use the correct screwdriver or Allen wrench to remove it.
3. **Access the inner parts:**
* For compression faucets: remove the packing nut and stem.
* For cartridges: pull the cartridge straight out.
* For ball faucets: remove the cam, packing, and ball.
* For ceramic disk: lift out the cylinder.
Take note of the order of parts—you’ll reassemble them in reverse.
5. Inspect and Replace Worn Parts
* **Compression faucet:** Replace the rubber washer at the end of the stem, and check the O-ring.
* **Cartridge faucet:** Replace the cartridge with an identical new one.
* **Ball faucet:** Replace springs, seats, and O-rings inside.
* **Ceramic disk:** Replace the rubber seals under the disk, or the whole cylinder if cracked.
Always take the old part to a hardware store to match it correctly.
6. Clean the Faucet Components
Before reassembly:
* Soak parts in white vinegar to remove mineral buildup.
* Use a soft cloth to clean threads and seats.
* Apply plumber’s grease to O-rings and moving parts.
7. Reassemble the Faucet

* Insert the new washer, O-ring, or cartridge.
* Reattach the stem, nut, or retaining clip.
* Screw the handle back on.
Make sure everything is snug but not overtightened (which can strip threads).
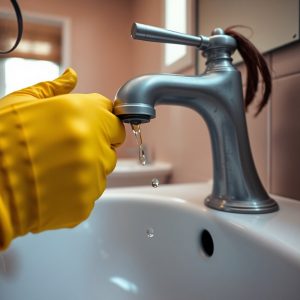
8. Restore Water Supply and Test
1. Turn the shutoff valves counterclockwise to open.
2. Slowly turn on the faucet.
3. Check for leaks around the handle or spout.
4. If it still drips, double-check that the part is seated correctly.
—
## 9. Prevent Future Drips
* Avoid closing handles with too much force—it wears washers faster.
* Clean faucets regularly to prevent mineral buildup.
* Replace parts as soon as dripping starts; waiting makes the problem worse.
10. When to Call a Plumber
DIY fixes work for most drips, but call a professional if:
* The faucet keeps leaking after part replacement.
* The shutoff valves don’t work.
* You notice corrosion or cracks in the faucet body.
✅ **Quick Summary:**
* Turn off water.
* Disassemble faucet.
* Replace worn washer, O-ring, or cartridge depending on type.
* Clean and reassemble.
* Test and avoid overtightening.