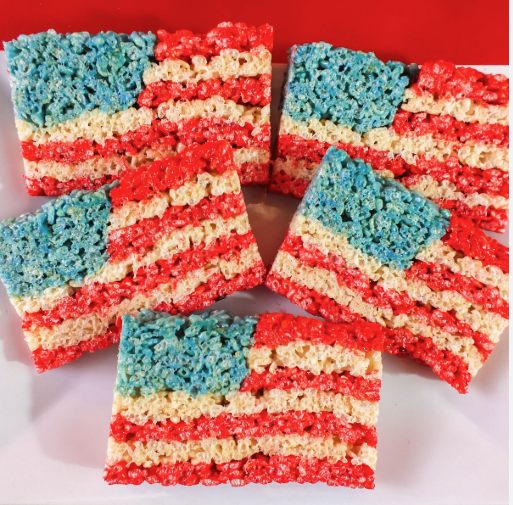
The 4th of July is one of the most celebrated holidays in the United States, marked by fireworks, parades, and backyard gatherings. Food is always at the center of the celebration, from grilled burgers and hot dogs to festive desserts. A simple treat like Rice Krispie squares can easily be transformed into a patriotic dessert with red, white, and blue colors. These 4th of July Rice Krispie Treats are fun, easy to make, and perfect for both kids and adults.
This recipe requires no baking, minimal ingredients, and can be ready in under an hour. By adding sprinkles, candy, or food coloring, you turn a classic childhood snack into a holiday centerpiece. Let’s go step by step and make treats that stand out on your Independence Day dessert table.
Ingredients
To make a 9×13-inch pan of treats (about 20 squares):
6 cups Rice Krispies cereal
4 tablespoons unsalted butter
1 bag (10 ounces) mini marshmallows
½ teaspoon vanilla extract (optional)
Red food coloring
Blue food coloring
½ cup red, white, and blue sprinkles or M&Ms
Step-by-Step Instructions
Step 1: Melt the Butter and Marshmallows
In a large pot over low heat, melt the butter completely. Add the mini marshmallows and stir constantly until smooth and melted. Stir in vanilla extract if using. This mixture is the base of every Rice Krispie treat.
Step 2: Divide the Mixture
Pour the melted marshmallow mixture into three bowls. Quickly stir 2 cups of cereal into each bowl while the mixture is still warm.
Leave one bowl plain (white layer).
Add red food coloring to the second bowl.
Add blue food coloring to the third bowl.
Mix until evenly coated. Adjust the amount of food coloring for vibrant patriotic layers.
Step 3: Layer the Colors
Grease a 9×13-inch baking dish with butter or nonstick spray.
Press the red mixture into the bottom of the dish.
Add the white mixture on top and press gently.
Finish with the blue mixture.
Press down lightly with a buttered spatula. Don’t press too hard, or the treats will be dense instead of chewy.
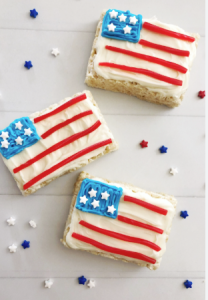
Step 4: Add Decorations
While still slightly warm, sprinkle red, white, and blue sprinkles or M&Ms across the top layer. Press them gently so they stick.
Step 5: Cool and Cut
Let the treats sit at room temperature for at least 1 hour. Cut into squares or rectangles. For extra fun, use star-shaped cookie cutters.
Tips for Success
Work quickly: Marshmallow mixture sets fast, so have your cereal and colors ready.
Nonstick tools: Use a buttered spatula or parchment paper to press layers evenly without sticking.
Don’t overpack: Light pressure keeps treats chewy and soft.
Storage: Store in an airtight container at room temperature for up to 3 days. Avoid refrigerating, as they get hard.
Party prep: You can make them the night before and decorate the next day.
Variations
Chocolate Drizzle: Melt white chocolate and drizzle over the cooled treats. Add extra sprinkles while the chocolate is wet.
Marshmallow Chunks: Fold extra mini marshmallows into the cereal before pressing into the pan.
Candy Mix-ins: Mix patriotic M&Ms into each layer for bursts of color inside the treats.
Dipped Treats: Cut into rectangles, insert popsicle sticks, and dip one side in melted chocolate for a festive popsicle-style snack.
Why This Recipe Works
Rice Krispie treats are popular because they balance gooey sweetness with crunch. Marshmallows melt into a sticky binder, while the butter adds richness and flavor. Dividing the mixture into three batches allows you to create patriotic layers without much effort. Decorating with sprinkles and candy takes the theme further, making the treats festive without complicating the recipe.
Serving Ideas
These treats work well in a variety of holiday settings:
Backyard BBQ: Place on a tray with brownies and cookies for a dessert spread.
Picnic: Pack in a sealed container for an easy grab-and-go dessert.
Kids’ Parties: Hand out as individual squares wrapped in parchment.
Fireworks Night: Enjoy as finger food while watching the sky light up.
Nutritional Info (per square, approx.)
Calories: ~120
Fat: 3g
Carbohydrates: 24g
Sugar: 12g
Protein: 1g
This varies depending on toppings like chocolate or candy.
History of Rice Krispie Treats
Rice Krispie treats were invented in 1939 by Kellogg’s employees Mildred Day and Malitta Jensen as a fundraiser recipe. Over time, they became a classic American snack, easy to prepare and endlessly adaptable. Their simplicity made them popular at school events, bake sales, and holidays. Today, themed variations like these patriotic ones keep the tradition alive.
Why They’re Perfect for the 4th of July
The holiday calls for easy, shareable desserts that can feed a crowd. Rice Krispie treats fit perfectly. They don’t require refrigeration, they transport easily, and they’re safe for kids to help make. The red, white, and blue theme aligns with Independence Day traditions, making them not only tasty but also visually festive.
Final Thoughts
These 4th of July Rice Krispie Treats are a simple way to add sweetness and color to your holiday table. With basic ingredients and minimal effort, you create a dessert that looks impressive and tastes familiar. They combine nostalgia with celebration, offering the best of both worlds.
Make them once, and they’re likely to become a tradition for every Independence Day. Whether you cut them into neat squares or festive stars, they’ll stand out among the burgers, hot dogs, and fireworks. Simple, fun, and delicious—everything a holiday treat should be.