The ability to perform simple home repairs is a valuable skill that can save you money, time, and the headache of waiting for a professional. While some tasks are best left to licensed experts, many common household issues can be tackled with basic tools and a can-do attitude. This guide will walk you through some fundamental home repairs, empowering you to maintain your living space with confidence.

Understanding Your Toolkit
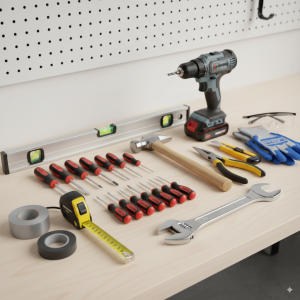
Before diving into repairs, ensure you have a basic toolkit. This doesn’t need to be extensive, but a few key items will make all the difference:
Screwdriver Set: Both Phillips and flathead in various sizes.
Hammer: A claw hammer is versatile for driving and pulling nails.
Pliers: Needle-nose and slip-joint pliers are useful for gripping and bending.

Adjustable Wrench: For tightening and loosening nuts and bolts of various sizes.
Tape Measure: Essential for accurate measurements.
Utility Knife: For cutting various materials.
Level: To ensure things are straight.
Drill (Cordless recommended): For drilling holes and driving screws.
Safety Glasses and Gloves: Always protect yourself!
Duct Tape and Electrical Tape: For temporary fixes and electrical insulation.
Having these items readily available will prepare you for most minor repair jobs.
Patching Drywall Holes
Drywall is surprisingly fragile, and accidental holes are common. Luckily, patching them is a straightforward process.
Small Holes (nail holes, screw holes):
Clean the Area: Remove any loose debris around the hole.
Apply Spackle: Using a putty knife, apply a small amount of spackle over the hole, pressing it firmly into the void.
Smooth: Scrape off excess spackle, leaving a smooth, flush surface.

Dry and Sand: Allow the spackle to dry completely (check product instructions for drying times). Once dry, lightly sand the area with fine-grit sandpaper until smooth.
Paint: Prime and paint the patched area to match the surrounding wall.
Larger Holes (fist-sized or larger):
Cut a Patch: Purchase a self-adhesive drywall patch or cut a piece of new drywall slightly larger than the hole.
Prepare the Hole: Trim any jagged edges around the hole to create a clean opening.
Apply Patch: If using a self-adhesive patch, center it over the hole and press firmly. If using a cut piece of drywall, you might need to add small wood backing strips inside the wall for the patch to screw into.
Apply Joint Compound: Apply a thin layer of joint compound (mud) over the patch, feathering the edges outwards.
Dry and Sand: Allow the first coat to dry, then apply a second thin coat if needed, ensuring a smooth transition. Sand thoroughly once dry.
Prime and Paint: Prime the patched area, then paint to match.
Fixing a Leaky Faucet
A dripping faucet is not only annoying but also wastes water. Most leaky faucets are caused by worn-out washers or O-rings.
Turn Off Water: Locate the shut-off valves under the sink and turn them clockwise to stop the water flow. If there aren’t individual shut-off valves, you’ll need to turn off the main water supply to your house.
Cover Drain: Place a rag or stopper over the drain to prevent small parts from falling in.

Disassemble Faucet:
Handle: Use a screwdriver to remove the screw holding the handle in place (often hidden under a decorative cap). Remove the handle.
Packing Nut/Bonnet Nut: Use an adjustable wrench to loosen and remove the large nut directly below where the handle was.
Stem/Cartridge: Carefully lift out the faucet stem or cartridge.
Inspect and Replace:
Washer Faucets: If your faucet has rubber washers, you’ll likely see a small rubber washer at the bottom of the stem. Remove it and replace it with a new one of the same size. Also, check the O-rings on the stem and replace them if they appear worn or brittle.
Cartridge Faucets: If you have a cartridge faucet, the entire cartridge might need to be replaced. Take the old cartridge to a hardware store to ensure you get an exact match.
Reassemble: Put the faucet back together in reverse order.
Turn On Water: Slowly turn the water supply back on and check for leaks.

Clearing a Clogged Drain
A slow or completely clogged drain is a common nuisance. Before calling a plumber, try these methods:
Boiling Water: For minor grease clogs, carefully pour a kettle of boiling water down the drain. This can sometimes dissolve the grease.
Baking Soda and Vinegar:
Pour ½ cup of baking soda down the drain.
Follow with ½ cup of white vinegar.
Cover the drain with a stopper and let it sit for 20-30 minutes. The reaction creates fizzing that can break down clogs.
Flush with hot water.
Plunger: For more stubborn clogs, a good quality plunger can often do the trick.
Ensure there’s enough water in the sink/tub to cover the rubber cup of the plunger.
Create a tight seal around the drain opening.
Plunge vigorously for 15-20 seconds, then quickly pull the plunger up. Repeat several times.
Drain Snake/Auger: If the above methods fail, a drain snake (or auger) can reach deeper clogs.
Feed the snake into the drain until you feel resistance.
Twist the snake to break up or hook onto the clog.
Slowly pull the snake back out, hopefully bringing the clog with it.
Flush with hot water.
Tightening Loose Screws and Hinges
Loose screws and wobbly furniture are easy fixes that can prevent bigger problems down the line.
Door Hinges: If a door is sagging or squeaking, the screws in the hinges might be loose. Use a screwdriver to tighten all the screws on both the door and the door frame. If a screw hole is stripped, remove the screw, insert a wooden toothpick or two into the hole with a little wood glue, break them off flush, and then reinsert the screw.
Cabinet Knobs/Pulls: Most cabinet hardware is secured with a single screw from the inside of the cabinet. Simply tighten these screws with the appropriate screwdriver.
Furniture: For wobbly chairs or tables, check all visible screws and bolts. Tighten them with a screwdriver or an adjustable wrench. For wooden joints that have come loose, you may need to disassemble, apply wood glue, clamp, and reassemble.
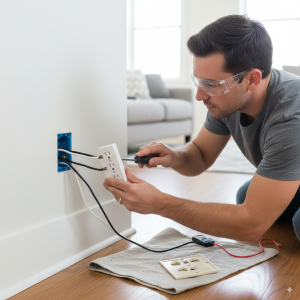
Replacing a Light Switch or Outlet
Disclaimer: Always exercise extreme caution when working with electricity. If you are unsure, consult a qualified electrician.
Turn Off Power: Crucially, turn off the power to the circuit at your home’s main electrical panel. Test the switch/outlet with a voltage tester to ensure the power is off.
Remove Cover Plate: Unscrew and remove the cover plate.
Unscrew Device: Remove the screws holding the old switch or outlet to the electrical box.
Disconnect Wires: Carefully pull the device out of the box. Note how the wires are connected (typically black/hot to brass screws, white/neutral to silver screws, green/ground to green screw). Use a screwdriver to loosen the terminal screws and disconnect the wires.
Connect New Device:
Ground: Connect the bare copper or green insulated ground wire to the green screw on the new device.
Neutral: Connect the white wire(s) to the silver screws.
Hot: Connect the black wire(s) to the brass screws. Ensure connections are tight and secure.
Install New Device: Gently push the new switch or outlet back into the electrical box and secure it with screws.
Attach Cover Plate: Replace the cover plate.
Restore Power: Go back to your electrical panel and turn the power back on. Test the new switch or outlet.