Sewing on a button might seem like a small, insignificant task, but it’s a fundamental skill that can save your favorite garments and extend their lifespan. Whether it’s a shirt, a coat, or a pair of trousers, a missing or loose button can render an otherwise perfectly good item of clothing unwearable. This comprehensive guide will walk you through the process step-by-step, ensuring you can confidently reattach any button with a professional finish.
Understanding Button Types and Their Attachment
Before you even pick up a needle, it’s helpful to understand the two main types of buttons and how they are typically attached:
Two-Hole and Four-Hole Buttons (Flat Buttons): These are the most common types. They have holes drilled directly through the button face. Two-hole buttons are simpler, while four-hole buttons offer a more secure attachment. They are sewn directly onto the fabric.
Shank Buttons: These buttons have a loop or a molded protrusion on their underside, known as a shank. The shank creates a space between the button and the fabric, which is essential for thicker fabrics or buttonholes that need extra clearance. You sew through the shank, not the button face.
For the purpose of this guide, we’ll primarily focus on flat buttons, as they are the most frequently encountered, but we will also touch upon shank buttons.
Essential Tools and Materials
Gathering your materials beforehand will make the process smooth and efficient.
The Button: Ideally, use the original spare button that often comes with new garments. If not, choose a button that matches in size, color, and style.
Needle: Select a hand-sewing needle that is thin enough to pass through the buttonholes easily but sturdy enough not to bend. A sharp point is crucial.
Thread: Opt for an all-purpose polyester or cotton-polyester blend thread. Choose a color that matches your garment or is slightly darker, as it will blend in better. For extra durability, you can use a button thread or a heavy-duty thread.
Scissors: Small, sharp scissors are ideal for snipping thread neatly.
Thimble (Optional but Recommended): A thimble protects your finger from needle pokes, especially when working with thicker fabrics or multiple layers.
Fabric Marker or Chalk (Optional): Useful for marking the exact placement of the button.
Straight Pins (Optional): To hold the button in place before you start sewing.
Toothpick or Matchstick (for flat buttons only): This is a secret weapon for creating a strong “thread shank” and is highly recommended.
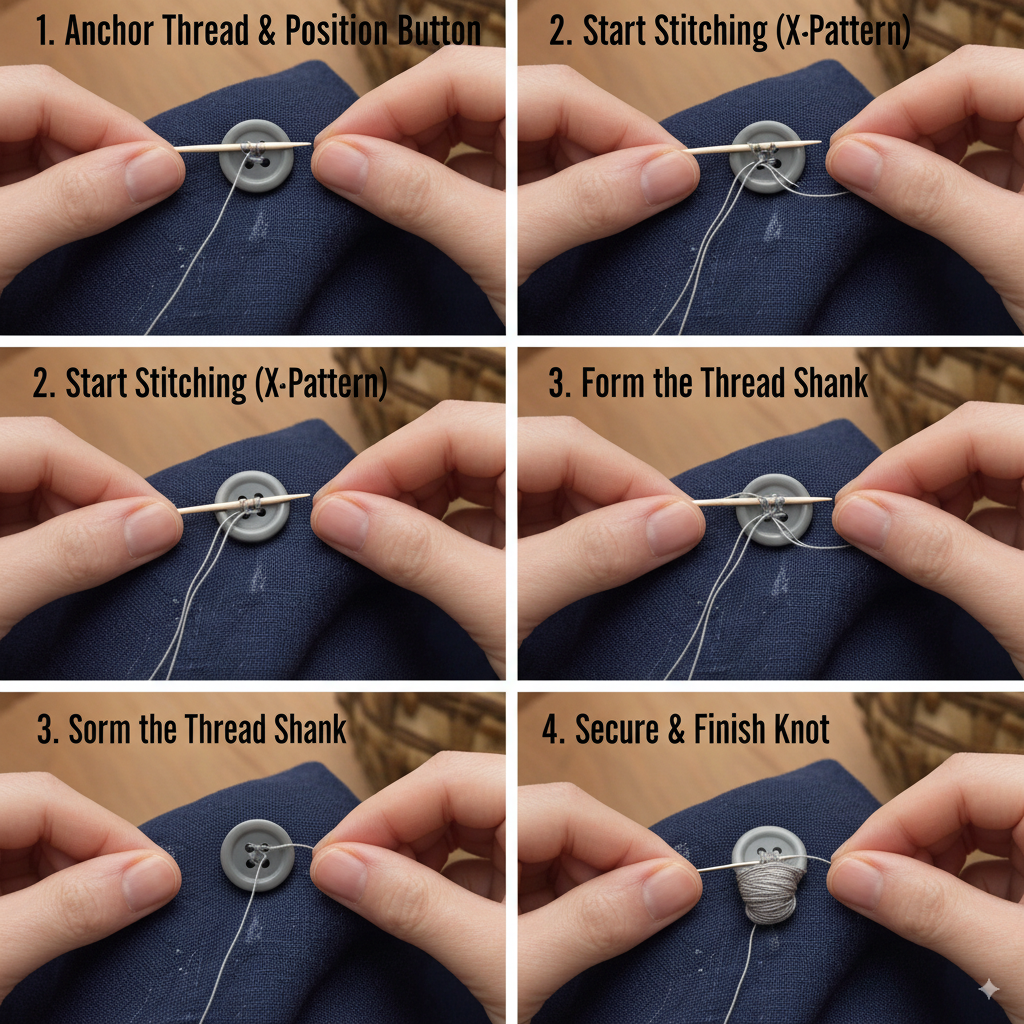
Step-by-Step Guide: Sewing a Two-Hole or Four-Hole Button
This is the most common button-sewing scenario. Follow these steps carefully for a secure and tidy result.
1. Prepare Your Thread:
* Cut a length of thread about 18-24 inches long. This is usually sufficient for one button and avoids tangles.
* Thread your needle. For extra strength, especially with frequently used buttons, you can double the thread. To do this, pull both ends of the thread through the needle eye so you have two strands hanging down.
* Tie a knot at the end of the thread. If you’ve doubled the thread, tie a knot in the four loose ends. A simple overhand knot or a double knot will suffice.
2. Mark the Button Placement:
* If you’re replacing a button, look for the original needle marks on the fabric.
* If there are no marks or you’re moving the button, align the garment so the buttonhole is directly over where the button should be.
* Use a fabric marker or chalk to mark the center point where the button will sit.
* Alternatively, you can just hold the button in place.

3. Anchor the Thread:
* From the wrong side of the fabric, bring your needle up through the fabric at the marked center point. Make sure you only catch a few threads of the garment, not going all the way through to the front if possible. This hides the knot.
* Pull the thread all the way through until the knot is snug against the back of the fabric.
* Make a tiny stitch very close to the first point, going back down to the wrong side. This creates a secure anchor for your thread.
* Bring the needle back up through the fabric at one of the button’s holes.
* Self-correction tip: If the original knot is visible from the front, start by taking a tiny stitch on the front, then flip to the back and make a tiny stitch through the knot to secure it.
4. Position the Button and Create a Thread Shank (Crucial for Flat Buttons!):
* Place the button directly over the anchored thread, aligning one of its holes with where the needle emerged.
* This is where the toothpick/matchstick comes in. Place a toothpick or a matchstick directly across the top of the button, centered between the holes you will be sewing through. This creates a small gap that will become your “thread shank.” This shank is crucial for allowing the fabric of the buttonhole to sit comfortably under the button when fastened, preventing puckering and making the button easier to use.
* Hold the button and the toothpick firmly in place. You can use a straight pin to secure the button if needed.
5. Start Sewing the Button (Two-Hole Button):
* With the toothpick in place, bring the needle down through the second hole of the button and then through the fabric, returning to the wrong side. Make sure you go through all layers of the fabric if necessary for stability.
* Pull the thread firmly but not so tight that it puckers the fabric.
* Bring the needle back up through the first hole, and repeat the process, going down through the second hole.
* Continue this process, making 6-8 passes through each set of holes. Each pass counts as going up through one hole and down through the other.
* Maintain even tension and ensure your stitches on the underside of the fabric are neat and relatively parallel.
6. Sewing a Four-Hole Button:
* For a four-hole button, you have options for your stitch pattern:
* Parallel: Sew through one pair of holes, then the other pair, creating two parallel lines of stitching.
* Cross (X-shape): Sew from one hole diagonally to the opposite hole, then repeat with the other diagonal pair. This is often the most secure.
* Whichever pattern you choose, ensure the toothpick is still in place.
* Make 6-8 passes through each set of holes.

7. Form the Thread Shank (The Finishing Touch for Flat Buttons):
* Once you’ve made all your passes through the buttonholes, bring your needle up from the wrong side of the fabric, but only through the fabric, not through any of the buttonholes. It should emerge just under the button.
* Carefully remove the toothpick or matchstick. You should now have a small space between the button and the fabric created by the loose stitches.
* Wrap the thread tightly around the stitches underneath the button, between the button and the fabric, about 4-6 times. This consolidates the stitches and forms a strong, defined thread shank. This is crucial for durability and functionality.
* Bring your needle through the wrapped threads and make a small knot.
8. Secure and Finish:
* After wrapping the shank, push your needle back down through the fabric to the wrong side.
* On the wrong side, make a small, secure knot close to the fabric. You can do this by picking up a few threads of the fabric, pulling the needle through to form a loop, and then passing the needle through the loop before pulling it tight. Repeat this knot once more for extra security.
* Trim any excess thread close to the knot.
Step-by-Step Guide: Sewing a Shank Button
Shank buttons are generally easier because you don’t need to create a separate thread shank.
1. Prepare Thread and Mark Placement:
* Follow steps 1 and 2 from the flat button guide.
2. Anchor the Thread:
* Follow step 3 from the flat button guide, bringing the needle up from the wrong side of the fabric where the button will sit.
3. Attach the Shank Button:
* Pass the needle directly through the loop (shank) on the underside of the button.
* Bring the needle back down through the fabric, close to where it initially emerged.
* Pull the thread through, ensuring the button is snug against the fabric. Do not pull too tightly, as this can make the button difficult to fasten. There should be a slight give.
* Repeat this process, making 8-10 passes through the shank.
4. Secure and Finish:
* Once you’ve made enough passes, bring your needle down to the wrong side of the fabric.
* On the wrong side, create a secure knot (as described in step 8 for flat buttons), pick up a few threads of the fabric, make a loop, and pass the needle through the loop twice.
* Trim the excess thread.
Tips for Success
Practice Makes Perfect: If you’re new to sewing, don’t be afraid to practice on an old piece of fabric before tackling your favorite shirt.
Even Tension: Maintain consistent tension throughout your sewing. Too loose, and the button will be wobbly; too tight, and the fabric will pucker.
Reinforce Often-Used Buttons: For buttons on cuffs, waistbands, or frequently used closures, consider using a button thread or making a few extra passes.
Check the Fabric: For delicate fabrics, use a finer needle and thread to avoid damaging the material.
Don’t Rush: Take your time. Sewing is a precise task, and hurrying can lead to mistakes.
By mastering the art of sewing on a button, you gain a valuable skill that not only extends the life of your wardrobe but also offers a sense of self-sufficiency. It’s a small repair that makes a big difference, ensuring your garments always look their best.
Here is a visual representation of how to sew on a four-hole button: